Every web developer hits the same wall eventually — you need a real server to test on, run a PHP app, or host a site. Shared hosting is too restricted. A local machine isn’t always on. What you actually need is a VPS with full control, and what’s even better is that you can get one free.
This guide installs a complete LAMP stack (Linux, Apache, MySQL, PHP 8.3) on Ubuntu 22.04 or 24.04 from scratch. By the end you’ll have a production-ready web server with SSL, a properly secured database, Apache virtual hosts for multiple domains, and optionally WordPress running — all on a free VPS with no credit card required.
What Is a LAMP Stack and When Do You Need One
LAMP stands for four open-source technologies that work together to serve dynamic web applications:
| Letter | Component | What It Does |
|---|---|---|
| L | Linux (Ubuntu) | The operating system — runs everything underneath |
| A | Apache HTTP Server | Web server — receives HTTP requests, serves files and PHP output |
| M | MySQL / MariaDB | Relational database — stores your application data |
| P | PHP 8.3 | Server-side language — generates dynamic HTML, interacts with the database |
You need a LAMP stack when you’re running PHP-based applications — WordPress, Laravel, Drupal, Joomla, custom PHP apps, or any CMS that requires a database backend. If you only need to serve static HTML files, a LAMP stack is overkill. If you need dynamic content, it’s the standard.
LAMP vs LEMP: the difference is Apache vs Nginx. Apache is easier to configure with .htaccess files (WordPress depends on this). Nginx is faster under heavy concurrent load. For most projects and for WordPress specifically, Apache is the right choice.
What You Need Before You Start
- A VPS running Ubuntu 22.04 or 24.04 — minimum 1 vCPU, 1 GB RAM, 10 GB storage
- Root or sudo SSH access
- A domain name (optional — needed for SSL and virtual hosts)
- About 15 minutes
The whole guide works without a domain name — you can test everything using your server’s IP address. A domain is only required for Step 9 (SSL) and Step 8 (virtual hosts for named domains).
Step 1 — Get a Free VPS
You need a public VPS — a home server or local VM won’t work for public web hosting. VPSWala’s free VPS gives you Ubuntu 22.04 or 24.04 with root access, a public IP, and no credit card required. The free Starter plan runs on Ampere ARM64 with 2 GB RAM — enough for a LAMP stack with light traffic. The 30-day Professional trial gives you 8-core AMD EPYC and 8 GB DDR5 ECC RAM for heavier workloads.
Once deployed, connect via SSH:
ssh root@YOUR_VPS_IPNew to SSH? Our SSH tips and tricks guide covers everything from key-based auth to tmux sessions.
Step 2 — Update the Server
Always start fresh on a new VPS:
sudo apt update && sudo apt upgrade -y
sudo apt install -y curl wget unzip git
This takes 1–2 minutes. Don’t skip it — package conflicts from outdated indexes are the most common source of mysterious install failures.
Step 3 — Install Apache
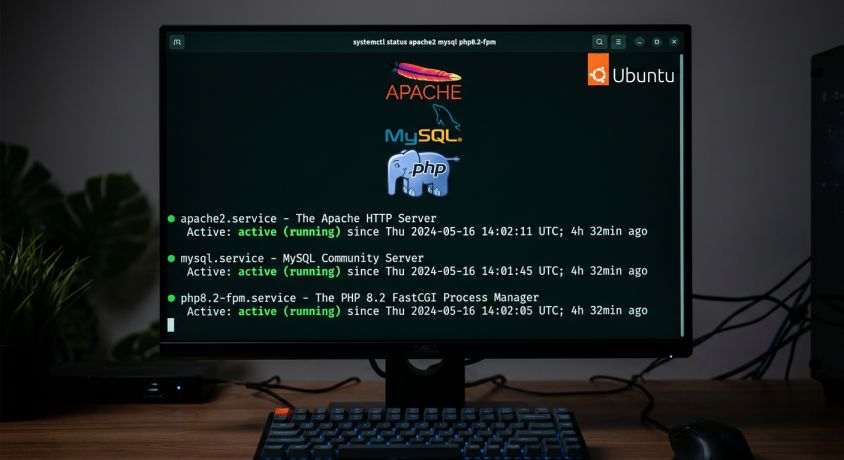
sudo apt install -y apache2Apache starts automatically after install. Check it:
sudo systemctl status apache2You should see active (running) in green. Enable it to start on every boot:
sudo systemctl enable apache2Test it immediately — open your VPS IP in a browser. You should see the Ubuntu Apache default page (“It works!”). If you see it, Apache is installed correctly and publicly reachable.
Step 4 — Configure the Firewall
Ubuntu ships with UFW (Uncomplicated Firewall). Open the ports you need:
# Allow SSH — do this first or you'll lock yourself out
sudo ufw allow OpenSSH

# Allow HTTP and HTTPS
sudo ufw allow 'Apache Full'

# Enable the firewall
sudo ufw enable

# Verify
sudo ufw status
The output should show ports 22, 80, and 443 as ALLOW.
Important: If your VPS provider has a separate cloud firewall (VPSWala’s Proxmox panel, AWS Security Groups, etc.), make sure ports 80 and 443 are also open there. UFW is an OS-level firewall — cloud provider firewalls sit above it and can block traffic before it ever reaches UFW. This is the most common reason Apache is installed correctly but still unreachable from a browser.
For a deeper look at firewall configuration, see our guide on how to open ports 80 and 443 with UFW.
Step 5 — Install MySQL and Secure It
Install MySQL:
sudo apt install -y mysql-server
sudo systemctl start mysql
sudo systemctl enable mysql
Verify it’s running:
sudo systemctl status mysqlNow secure the installation — this removes anonymous users, disables remote root login, and removes the test database:
sudo mysql_secure_installationWork through the prompts:
- VALIDATE PASSWORD plugin: Type
Y— enforces strong passwords - Password strength level: Type
2(STRONG) for production,0for dev - Remove anonymous users:
Y - Disallow root login remotely:
Y - Remove test database:
Y - Reload privilege tables:
Y
Create a Database and User for Your Application
Never use the MySQL root user for your web application. Create a dedicated user:
sudo mysql -u root-- Create a database
CREATE DATABASE myapp CHARACTER SET utf8mb4 COLLATE utf8mb4_unicode_520_ci;
-- Create a dedicated user
CREATE USER 'myapp_user'@'localhost' IDENTIFIED BY 'StrongPassword123!';
-- Grant permissions
GRANT ALL PRIVILEGES ON myapp.* TO 'myapp_user'@'localhost';
FLUSH PRIVILEGES;
EXIT;Replace myapp, myapp_user, and the password with your own values. Write them down — you’ll need them when configuring your application.
For a deeper dive into MySQL on VPS, see our post on how databases like MySQL work on a VPS.
Step 6 — Install PHP 8.3
Ubuntu 24.04 ships PHP 8.3 in its default repositories. Ubuntu 22.04 ships PHP 8.1 by default — to get PHP 8.3 on 22.04, add the Ondřej Surý PPA first:
# Ubuntu 22.04 ONLY — skip this block on 24.04
sudo add-apt-repository ppa:ondrej/php -y
sudo apt update
Install PHP and all extensions a typical web application needs:
sudo apt install -y php8.3 libapache2-mod-php8.3 php8.3-mysql \
php8.3-curl php8.3-gd php8.3-mbstring php8.3-xml php8.3-zip \
php8.3-intl php8.3-opcache php8.3-bcmath php8.3-imagick php8.3-cli
Verify the install:
php -vEnable the PHP module in Apache and restart:
sudo a2enmod php8.3
sudo systemctl restart apache2
Check PHP is working with Apache by creating a test file:
sudo nano /var/www/html/info.php<?php
phpinfo();
?>Visit http://YOUR_VPS_IP/info.php — you should see the full PHP info page with version, modules, and configuration. If you see raw PHP code instead of a formatted page, the Apache PHP module isn’t enabled — run sudo a2enmod php8.3 && sudo systemctl restart apache2.
Delete the info.php file immediately after testing — it exposes sensitive server configuration to the public:
sudo rm /var/www/html/info.phpStep 7 — Test the Full Stack
Now verify all three components talk to each other — Apache serves PHP, PHP connects to MySQL:
sudo nano /var/www/html/test.php<?php
// Test PHP
echo "<h2>PHP Version: " . PHP_VERSION . "</h2>";
// Test MySQL connection
$conn = new mysqli('localhost', 'myapp_user', 'StrongPassword123!', 'myapp');
if ($conn->connect_error) {
echo "<p style='color:red'>MySQL connection failed: " . $conn->connect_error . "</p>";
} else {
echo "<p style='color:green'>MySQL connected successfully!</p>";
$conn->close();
}
?>Visit http://YOUR_VPS_IP/test.php — you should see your PHP version and “MySQL connected successfully!” in green. If MySQL connection fails, double-check the username, password, and database name match exactly what you created in Step 5.
Delete the test file when done:
sudo rm /var/www/html/test.phpYour LAMP stack is fully working. Steps 8–11 are configuration and optional extras.
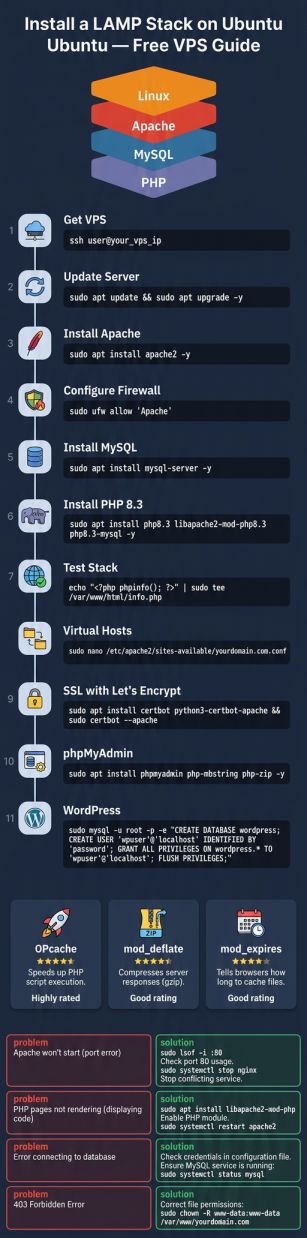
Step 8 — Configure Apache Virtual Host
Virtual hosts let you run multiple websites on one server — each with its own domain, document root, and configuration. Even for a single site, setting up a virtual host is better practice than dumping files in /var/www/html.
Create a directory for your site:
sudo mkdir -p /var/www/yourdomain.com
sudo chown -R www-data:www-data /var/www/yourdomain.com
sudo chmod -R 755 /var/www/yourdomain.com
Create a test index file:
echo "<h1>yourdomain.com is working!</h1>" | sudo tee /var/www/yourdomain.com/index.htmlCreate the virtual host configuration:
sudo nano /etc/apache2/sites-available/yourdomain.com.conf<VirtualHost *:80>
ServerName yourdomain.com
ServerAlias www.yourdomain.com
DocumentRoot /var/www/yourdomain.com
ErrorLog ${APACHE_LOG_DIR}/yourdomain.com-error.log
CustomLog ${APACHE_LOG_DIR}/yourdomain.com-access.log combined
<Directory /var/www/yourdomain.com>
AllowOverride All
Require all granted
</Directory>
</VirtualHost>Enable the site and the rewrite module (needed for WordPress permalinks and most PHP frameworks):
sudo a2ensite yourdomain.com.conf
sudo a2enmod rewrite
sudo a2dissite 000-default.conf
sudo systemctl reload apache2
Test the configuration syntax before reloading — catches errors before they take down your server:
sudo apache2ctl configtestShould return Syntax OK. If it returns errors, check your virtual host file for typos.
Step 9 — Add Free SSL with Let’s Encrypt
Every production site needs HTTPS. Let’s Encrypt provides free auto-renewing SSL certificates via Certbot:
sudo apt install -y certbot python3-certbot-apache
sudo certbot --apache -d yourdomain.com -d www.yourdomain.com
Certbot will ask for an email address, ask you to agree to terms, and ask whether to redirect HTTP to HTTPS — choose 2 (Redirect) to force HTTPS on all traffic.
Test auto-renewal:
sudo certbot renew --dry-runCertbot installs a cron job that renews certificates automatically before they expire. You never need to renew manually. For more on SSL configuration see our guide on why your site needs SSL and which type to choose.
Step 10 — Install phpMyAdmin (Optional)
phpMyAdmin gives you a browser-based GUI to manage your MySQL databases — useful if you prefer not to use the command line for database work.
sudo apt install -y phpmyadminDuring install you’ll be asked:
- Web server to configure: Select
apache2with spacebar, then Enter - Configure database with dbconfig-common: Yes
- MySQL password for phpMyAdmin: Set a strong password
Enable the phpMyAdmin configuration in Apache:
sudo ln -s /etc/phpmyadmin/apache.conf /etc/apache2/conf-available/phpmyadmin.conf
sudo a2enconf phpmyadmin
sudo systemctl reload apache2
Access it at http://YOUR_VPS_IP/phpmyadmin — log in with your MySQL credentials.
Security note: Exposing phpMyAdmin on a public URL is a significant attack surface. Either restrict access by IP, change the URL path, or disable it when not in use. Use it for setup, then remove the symlink with sudo a2disconf phpmyadmin && sudo systemctl reload apache2 until needed again.
Step 11 — Install WordPress on LAMP (Optional)
WordPress is the most common reason people set up a LAMP stack. With everything above in place, the install is straightforward:
# Download WordPress
cd /var/www/yourdomain.com
sudo wget https://wordpress.org/latest.tar.gz
sudo tar -xzf latest.tar.gz
sudo mv wordpress/* .
sudo rm -rf wordpress latest.tar.gz

# Set correct ownership
sudo chown -R www-data:www-data /var/www/yourdomain.com

# Create wp-config.php
sudo cp wp-config-sample.php wp-config.php
sudo nano wp-config.php
Update the database section in wp-config.php:
define( 'DB_NAME',     'myapp' );
define( 'DB_USER',     'myapp_user' );
define( 'DB_PASSWORD', 'StrongPassword123!' );
define( 'DB_HOST',     'localhost' );
Also update the security keys by visiting https://api.wordpress.org/secret-key/1.1/salt/ and replacing the matching block in wp-config.php.
Visit your domain in a browser — you’ll see the WordPress installation wizard. For the full detailed WordPress setup guide including PHP tuning and caching, see our post on how to install WordPress on a free VPS.
Performance Tuning
Enable OPcache
OPcache compiles PHP to bytecode and caches it in memory — PHP doesn’t re-parse files on every request. It’s already installed, just needs proper configuration:
sudo nano /etc/php/8.3/apache2/php.iniFind and set these values:
opcache.enable=1
opcache.memory_consumption=128
opcache.interned_strings_buffer=8
opcache.max_accelerated_files=4000
opcache.revalidate_freq=60
Tune PHP Upload and Memory Limits
In the same php.ini file:
upload_max_filesize = 64M
post_max_size = 64M
memory_limit = 256M
max_execution_time = 300
max_input_vars = 3000
Enable Apache Compression
sudo a2enmod deflate
sudo systemctl reload apache2
Enable Browser Caching via .htaccess
Add this to your site’s .htaccess file:
<IfModule mod_expires.c>
    ExpiresActive On
    ExpiresByType text/css "access plus 1 month"
    ExpiresByType application/javascript "access plus 1 month"
    ExpiresByType image/jpeg "access plus 1 month"
    ExpiresByType image/png "access plus 1 month"
    ExpiresByType image/webp "access plus 1 month"
    ExpiresByType image/x-icon "access plus 1 year"
</IfModule>
sudo a2enmod expires
sudo systemctl reload apache2LAMP Stack Performance Summary
| Optimization | Impact | What It Does |
|---|---|---|
| OPcache | Very high | Caches compiled PHP bytecode — eliminates parse time on repeat requests |
| mod_deflate | Medium | Gzip compresses HTML/CSS/JS — reduces page size 60–80% |
| mod_expires | Medium | Browser caches static assets — reduces repeat page loads |
| Page caching plugin | Very high (WordPress) | Serves cached HTML — skips PHP/MySQL entirely on cached pages |
| MySQL query cache | High for DB-heavy apps | Caches query results in memory — fewer disk reads |
Troubleshooting
| Problem | Likely Cause | Fix |
|---|---|---|
| Browser shows raw PHP code | PHP module not enabled in Apache | sudo a2enmod php8.3 && sudo systemctl restart apache2 |
| Apache not reachable in browser | Firewall blocking port 80 | Check both UFW (sudo ufw status) and your cloud provider firewall panel |
| MySQL connection refused | MySQL not running or wrong credentials | sudo systemctl start mysql — verify user/password/database match Step 5 |
| Permission denied on /var/www | Wrong file ownership | sudo chown -R www-data:www-data /var/www/yourdomain.com |
| WordPress .htaccess rewrite not working | mod_rewrite disabled or AllowOverride not set | sudo a2enmod rewrite and set AllowOverride All in virtual host config |
| SSL cert fails | DNS not propagated or port 443 blocked | Run dig yourdomain.com +short — IP must match your VPS. Open port 443 in firewall |
| apache2ctl configtest shows errors | Syntax error in virtual host file | Read the error message carefully — it shows the file and line number. Common issues: missing closing tags, wrong directive names |
| 500 Internal Server Error | PHP error or .htaccess misconfiguration | Check sudo tail -f /var/log/apache2/error.log — the actual error is always in the log |
Your LAMP stack is live. Apache serves HTTP and HTTPS, MySQL stores your data, PHP processes your application, and OPcache keeps everything fast. This is the same stack that powers the majority of the web including WordPress, Drupal, Joomla, Laravel, and thousands of custom PHP applications.
For heavier workloads — multiple sites, high traffic, or memory-intensive PHP applications — the VPSWala Professional free trial gives you 8-core AMD EPYC and 8 GB DDR5 ECC RAM on the same infrastructure, free for 30 days. No credit card required.
Next steps: set up subdomains with SSL to host multiple sites, read our guide on securing and firewalling your VPS, and check out automated VPS backup strategies to protect your data.