So you just switched from shared to the Virtual Private Server (VPS) and that is an easy transition. But, understanding how to set up a VPS could be a bit more challenging in particular if you’ve not previously used the command line.
In this article we’ll guide you through the steps you can set up your VPS server in just five steps:
- Learn how to login into your VPS through Secure Shell (SSH) access.
- The server should be updated.
- The creation of a new user, and changing its privileges.
- Enabled authenticating with public keys.
- Installing a firewall on your VPS.
Before we go into the technical aspects, however, we’ll describe the reasons you’ll need to set up your virtual server. Let’s discuss how to set up the VPS!
Why You Should Configure Your New VPS
Typically, when you sign up to the basic hosting plan the provider will install all the necessary software to make use of it. For hosted hosting that is shared, for instance, you’ll likely have an account control panel to your account immediately:
The hosting control panels will give you the choices you require to set up your account. However, most of the time you won’t have the opportunity to alter your server’s settings because there are other users using the same server.
If you have a VPS, you’re not just getting a VPS you have the server infrastructure all for yourself. In the majority of cases, the hosting provider will take the time to set up the basic server software, for instance, Apache or Nginx, and the rest is left to you to decide. This means that you’ll likely need to take several additional steps to make sure your server is “ready” for use, including:
- Deciding when to begin using VPS.
- Connecting to the system and sending commands.
- Find out how to install the latest software and update it.
- Setting up account creation for new users (if required).
- Set up firewalls.
When we talk about delivering instructions to the server we’re talking about something like this:
Most likely, you’ll connect to your VPS via the command line rather than using a Graphical User Interface (GUI). This can be a bit intimidating initially however, you’ll soon get used to it if do not mind searching the internet to find the appropriate commands and following a few basic instructions.
There are also hosting control panels to allow you to communicate with your server through the GUI. But we’re not going to go over the subject in this article as it’s usually the best option. Additionally, knowing how to run simple commands will help you learn many things about managing servers that will be useful when your website grows.
5 Steps to Configure Your New VPS and Get It Up And Running
As you’re probably aware that the majority of servers operate on Unix-based platforms. This means that you’ll have to make use of commands that are specific to this kind of Operating System (OS), which may not be like the ones you’d find on the Windows machine.
Now that we have that over we can discuss how to set up the VPS!
1. Understand how to log into your VPS using Secure Shell (SSH) Access
There are a variety of ways to connect to a site other than using browsers. For instance, you can utilize File Transfer Protocol (FTP) which allows users to download, upload and modify the files stored on your server:
Although FTP is a great option, however, it doesn’t allow users to issue instructions to the server. In order to do that, you’ll have to utilize Secure Shell (SSH) access which is a distinct kind of protocol that allows access to servers located in remote locations.
When you connect to a server through SSH and you’ll be able to issue instructions to the server. SSH is also known for its robust security protocols and encryption which makes it extremely secure. When you learn how to use SSH it will be able to take your first steps in the management of servers.
After you have signed to a VPS plan Your web host should offer you a number of credentials, which include:
- The IP address of your server
- The username (usually root)
- A root password for your account
If you’re unfamiliar with the meaning of the word an administrator (or superuser) account is a person with complete access and privileges on specific systems. It can be thought of as equivalent to an administrator, with a lot more capabilities.
Now if you are setting up the VPS it will start with only one root account, which you’ll use for your initial connections. If you’re running the Unix-based operating system on your own it is possible to connect directly to the server using the command line.
However, if you’re using Windows it’s first necessary in order to set up the SSH client. We’re fond of two particular clients one of which is known as Bitvise:
If you’re in search of a straightforward interface that’s reminiscent of the traditional Windows look, then you won’t get it wrong using Bitvise. But, you’ll do much of your work via Command Line, therefore the design isn’t that important.
We’re also huge fans of PuTTY with its minimalist interface. However, it provides many other options for configuration, making it an ideal choice for those who would like to dive into the realm of server management.
In the remainder of this guide, we’ll use PuTTY for our demonstrations. In this regard, you can install the program and then launch it. You’ll get a screen like this:
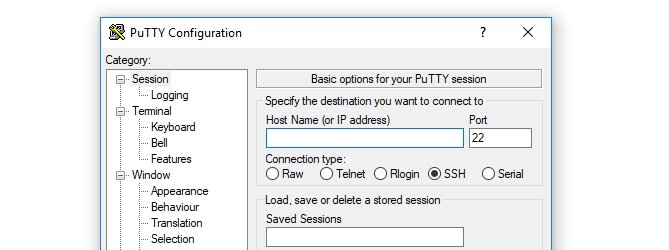
At this point you will need to input the IP address of your server in your Host Name (or IP Address) area, then leave the Port setting at the default value of 22:
In addition to SSH connections port 22 is also used to secure logins as well as Secure File Transfer Protocol (SFTP).
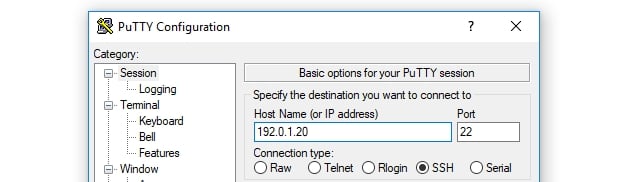
There’s an option to select the type of connection you wish to use in the field for IP. Select SSH and you’re able to press”Open.
A command-line prompt will appear right now, and you’ll be presented with an option to input your login details. In this instance, that is root and the password.

If the information you was entered correctly You’ll be able to see a short overview of the server’s information as well as a prompt to type in additional commands:
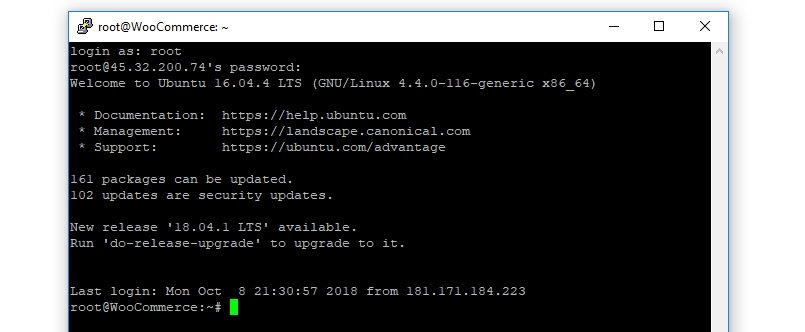
This is the first step to set up a VPS. Do not quit the command-line window just yet, however, since we have a lot of work to complete.
Step 2: Update Your Server
When you sign in to your VPS and log in, you’ll get an error message telling you whether there are “packages” or security updates available:
Software is basically software that is written in Unix-speak. In the case of every system in the world, it’s vital to keep its components current and servers aren’t an exception.
If you’re using software that isn’t up-to-date opens up your server (and your website) to security flaws. In addition, you may miss out on new features or enhanced performance. The first thing you’ll need to do is to update your server’s software and download any current security patches.
To begin, enter the apt update command, and press Enter. The server will verify which software needs to be upgraded. After that, you can enter the command apt upgrade. This will update the server’s software:
The dist-upgrade command is run.
The process could take some time, based on the number of updates your server requires to install. So, relax, drink some coffee and sit back and watch it be completed.
If all your software is current You should proceed and restart your server with the command reboot. Close the command window. Give it a few minutes before logging in again with PuTTY (or your preferred client).
If everything went as planned it shouldn’t be any additional updates available. We can then proceed to the next stage of understanding how to setup a VPS.
Step 3: Create a New User and Modify Its Privileges
When you create the VPS, you’ll start by creating a root account this is the account you’ve used to date. It’s recommended to create a second user account with superuser rights.
The reason behind this is that the root account could cause serious damage if you’re unsure exactly what you’re doing. The root account has access to the settings on your system, and an error can cause grave issues.
A normal user account that has superuser rights, on the other hand, must include the sudo suffix to any command that it wants to run with the administrative privileges. It may appear to be something minor however, it’s the world of difference. This way it is important be aware before running any command with the sudo prefix. This will help you avoid a mishap.
Set the new user up with this command. You’ll have to change the last line with the username you’d like to use:
adduser yournewusername
Enter the following line in order to include the account to sudo giving it superuser rights (again by replacing that placeholder by your own username):
# usermod -aG sudo yournewusername
All that’s left to do is set up an account password. There’s an alternative which is much safer than an ordinary password. This is the one we’ll explore in the next.
Step 4: Enable Public Key Authentication
A public-key encryption method that’s possibly more secure than normal passwords. By using this method, you can generate an array of both public keys’ as well as private.
The server will save the public keys and then use them to verify your private one that only you be able to access via an image on your personal computer. After you’ve set up your public key security, you’ll require both your private key and an access code to sign in, which will increase security by a significant amount.
To create SSH keys for Windows it is possible to use the PuTTYgen application, which will be installed after you installed the client previously (for information on how to perform this on Linux or Unix systems, read this article). Find your program for it, and then run the PuTTYgen application now.
It’s okay to stick with the default settings of you key, but you can click the Generate button right now. In order to make the key individual it will ask users to drag their mouse to randomize it. This is quite cool:
The program will then show you the public key it created for you. Before doing anything else, make sure you go ahead and create an associated passphrase for it that will function as a password along with the key
Set up a passphrase to your keys.
Then, press then the Save the private key and then save the files to your PC. Also, you’ll need to transfer your public key shortly therefore, don’t close the screen just right now.
Log back in to your server as the root user you used previously and transfer to the new account’s home directory by using # su – – yournewusername. The command line should now reflect the new user’s name:

Switching users using by using the command line.
Following that, you’ll need to run a set of commands sequentially to create a new folder to store you public key. You’ll then need to then limit the permissions for that folder and then save your key
Mkdir ~/.ssh
Chmod 700 ~/.ssh
nano ~/.ssh/authorized_keys
This last command will launch your Nano editor, which allows you to edit the newly authorized_keys.dat file in your system. Copy your public key in the PuTTYgen window and then paste it into this.
When you are ready to use the key Once the key is in place, press CTRL + X, to quit the editor. Enter the number Y when it asks you to verify the change you made to the file. Enter the following commands:
chmod 600 ~/.ssh/authorized_keys
Exit
These will alter the permissions of the file that you have modified, and return your user to root.
The next step is to make sure that you configure PuTTY to make use of your private key every time it connects to your host, so it is able to recognize you. In order to do that, go back to the main page of the application and then go into the Connection > SSH > Auth section. Within, you’ll see an option called Private key file to authenticate:
Click the Browse button, then search for the private key file that you have saved within your PC. Select it and you’re done.
Then, you’ll need to instruct your server to deactivate the default authentication method using passwords only for the user you have just created. To do this, sign into your server as your new user using SSH and then run the following command:
sudo nano /etc/ssh/sshd_config
This will open the sshd_config.ini file with it’s Nano editor. Look for the line that reads PasswordAuthentication inside that file, and delete the # sign before it. Change its value between Yes and No such that it reads as follows:
PasswordAuthentication no
Save the modifications to the file, then restart your server. When you next attempt to login you’ll be able to login with your password and private key.
Step 5: Set Up a Firewall for Your VPS
We’ve covered plenty of ground already on how to setup an VPS. But, there’s one last step to take in order to keep your server safe. This is to set up a firewall to protect it.
This is done with the iptables software, which allows you to create rules that limit the flow of traffic to or from your servers. This procedure is quite complicated, however, and we suggest that you read our complete tutorial on setting up Iptables correctly and make sure that the program is properly configured.
This could seem like excessive initially. However, with Iptables you’ll be in a position to restrict the ports that allow access to your server. This can stop a number of attacks at a single point. Additionally, it’s a single installation process and it’s important to start it immediately.
Conclusion
The process of setting up a VPS following the upgrade from shared hosting will be like getting out of the child’s pool and diving into an Olympic-sized pool. There’s a lot more space and options to enjoy however, you’ll have to get your feet on the ground before you can begin having fun. Once you’ve learned how to set up your VPS, you’re more familiar with using the Command Line which makes it much simpler to set up everything according to your needs.
Have you got any questions regarding how to set up a VPS? Let’s discuss them in the comments below!