

Zapier and Make are great until the bill shows up. You build five or six useful automations, your task count climbs, and suddenly you’re paying more per month than a small server costs. And that’s before you hit the limits of what the plan lets you do.
That’s why so many people are moving to n8n. It’s a visual workflow automation tool, like Zapier, but you can run it on your own server. No per-task fees, no limits on workflows, and your data stays on a machine you control.
In this guide, we’ll set up n8n on a VPS the proper way: Docker Compose for the app, Postgres as the database, Nginx in front, and a free Let’s Encrypt SSL certificate. When we’re done, you’ll have your own n8n instance at your own domain, running 24/7.
What Is n8n (and Is It Really Free)?
n8n lets you connect apps and services by dragging nodes onto a canvas. A node can be a Gmail trigger, a Google Sheets update, a Telegram message, an HTTP request, a database query, or an AI step. Connect a few of them and you’ve built an automation.
A few examples of what people run on it:
- Save every form submission to Google Sheets and send yourself a Telegram alert.
- Check your websites every few minutes and message you when one goes down.
- Pull new leads from a form into your CRM and send a welcome email.
- Summarize incoming emails with an AI model and post the summary to Slack.
- Schedule social posts, backups, and daily reports.
Now, about the “free” part. n8n is source-available, not traditional open source. The self-hosted Community Edition is free to run for your own use or your own business’s internal use, but it’s released under n8n’s own license. If you plan to resell n8n as a service to clients, read the license first. For personal projects and your own company, you’re fine. You’ll only pay for the VPS.
What You Need Before You Start
- A VPS running Ubuntu 22.04 or 24.04 with at least 1 GB RAM. For several active workflows, we’d go with 2 GB. You can get a Linux VPS here or test the waters with a free VPS trial.
- A domain or subdomain for n8n, such as
n8n.example.com. You need this for HTTPS, and many services (Google, Slack, and others) won’t connect their login flows to a plain IP address. - SSH access to the server and a user with
sudorights.
New to VPS management? Start with our guide on the first things to do after launching your Linux VPS.
Step 1: Update Your VPS and Install Docker
Connect to your server and update everything:
sudo apt update
sudo apt upgrade -y
Install Docker using the official convenience script:
curl -fsSL https://get.docker.com | sudo shAdd your user to the docker group so you don’t need sudo for every Docker command, then log out and back in for it to take effect:
sudo usermod -aG docker $USER
exit
Reconnect over SSH and check that Docker and the Compose plugin work:
docker --version
docker compose version
Want more detail on Docker itself? See our guide on installing Docker on Ubuntu.
Step 2: Create the Project Folder and Secrets
Keep everything for n8n in one folder:
mkdir ~/n8n
cd ~/n8n
First, generate two random secrets. You’ll need one for the database password and one for n8n’s encryption key:
openssl rand -hex 16
openssl rand -hex 32
Run each command and copy the output somewhere safe for a moment. Now create a .env file:
nano .envPaste this in and replace the values with your own:
N8N_HOST=n8n.example.com
TIMEZONE=America/New_York

POSTGRES_USER=n8n
POSTGRES_DB=n8n
POSTGRES_PASSWORD=PASTE_THE_16_BYTE_HEX_HERE

N8N_ENCRYPTION_KEY=PASTE_THE_32_BYTE_HEX_HERE
Set TIMEZONE to your own timezone (for example Europe/London or Asia/Kolkata). This matters because scheduled workflows run on this clock.
Important: save your N8N_ENCRYPTION_KEY in a password manager. n8n uses it to encrypt the credentials (API keys, passwords, tokens) you store inside workflows. If you lose it, you lose access to every saved credential, even if you have a database backup.
Lock the file down so only your user can read it:
chmod 600 .envStep 3: Create the Docker Compose File
We’ll run two containers: n8n itself and a Postgres database. n8n can use its built-in SQLite database for small tests, but Postgres is more reliable once you have real workflows and execution history.
nano docker-compose.ymlPaste this:
services:
  postgres:
    image: postgres:16-alpine
    restart: unless-stopped
    environment:
      - POSTGRES_USER=${POSTGRES_USER}
      - POSTGRES_PASSWORD=${POSTGRES_PASSWORD}
      - POSTGRES_DB=${POSTGRES_DB}
    volumes:
      - postgres_data:/var/lib/postgresql/data
    healthcheck:
      test: ["CMD-SHELL", "pg_isready -U ${POSTGRES_USER} -d ${POSTGRES_DB}"]
      interval: 5s
      timeout: 5s
      retries: 10

  n8n:
    image: docker.n8n.io/n8nio/n8n
    restart: unless-stopped
    ports:
      - "127.0.0.1:5678:5678"
    environment:
      - DB_TYPE=postgresdb
      - DB_POSTGRESDB_HOST=postgres
      - DB_POSTGRESDB_PORT=5432
      - DB_POSTGRESDB_DATABASE=${POSTGRES_DB}
      - DB_POSTGRESDB_USER=${POSTGRES_USER}
      - DB_POSTGRESDB_PASSWORD=${POSTGRES_PASSWORD}
      - N8N_HOST=${N8N_HOST}
      - N8N_PORT=5678
      - N8N_PROTOCOL=https
      - WEBHOOK_URL=https://${N8N_HOST}/
      - N8N_PROXY_HOPS=1
      - N8N_ENCRYPTION_KEY=${N8N_ENCRYPTION_KEY}
      - GENERIC_TIMEZONE=${TIMEZONE}
      - TZ=${TIMEZONE}
    volumes:
      - n8n_data:/home/node/.n8n
    depends_on:
      postgres:
        condition: service_healthy

volumes:
  postgres_data:
  n8n_data:
A few lines are worth understanding:
"127.0.0.1:5678:5678"publishes n8n only on the server itself. Docker normally bypasses UFW firewall rules for published ports, so if you wrote"5678:5678"instead, n8n would be open to the whole internet on port 5678 even with your firewall on. Binding to127.0.0.1avoids that. Nginx will be the only way in.WEBHOOK_URLtells n8n the public address to show for webhooks. If it’s wrong, your webhook URLs will saylocalhostand nothing outside will be able to call them.N8N_PROXY_HOPS=1tells n8n it sits behind one reverse proxy (Nginx), so it reads the real visitor IP correctly.- The two
volumeskeep your data safe when containers are recreated or updated.
Step 4: Start n8n
docker compose up -dThe first run downloads the images, so give it a minute or two. Then check that both containers are up:
docker compose psAnd watch the n8n logs until you see that the editor is ready:
docker compose logs -f n8nPress Ctrl + C to leave the logs (the containers keep running). To test that n8n responds on the server, run:
curl -I http://127.0.0.1:5678A 200 OK response means n8n is alive. Because we set restart: unless-stopped, it will also come back by itself after a crash or a server reboot.
Step 5: Set Up Nginx as a Reverse Proxy
n8n is running, but only on 127.0.0.1:5678. Nginx will take public traffic on ports 80 and 443 and pass it to n8n. We covered the concept in how to set up an Nginx reverse proxy on a VPS.
sudo apt install -y nginx
sudo nano /etc/nginx/sites-available/n8n
Paste this in, replacing the domain with yours:
server {
    listen 80;
    listen [::]:80;
    server_name n8n.example.com;

    client_max_body_size 50M;

    location / {
        proxy_pass http://127.0.0.1:5678;
        proxy_http_version 1.1;
        proxy_set_header Upgrade $http_upgrade;
        proxy_set_header Connection "upgrade";
        proxy_set_header Host $host;
        proxy_set_header X-Real-IP $remote_addr;
        proxy_set_header X-Forwarded-For $proxy_add_x_forwarded_for;
        proxy_set_header X-Forwarded-Proto $scheme;
        proxy_buffering off;
        proxy_read_timeout 300s;
    }
}
The Upgrade and Connection lines are required. The n8n editor uses WebSockets to show live execution results, and without them you’ll see a “Connection lost” message in the editor. The longer proxy_read_timeout stops Nginx from cutting off slow workflow runs.
Enable the site, test the config, and reload:
sudo ln -s /etc/nginx/sites-available/n8n /etc/nginx/sites-enabled/
sudo nginx -t
sudo systemctl reload nginx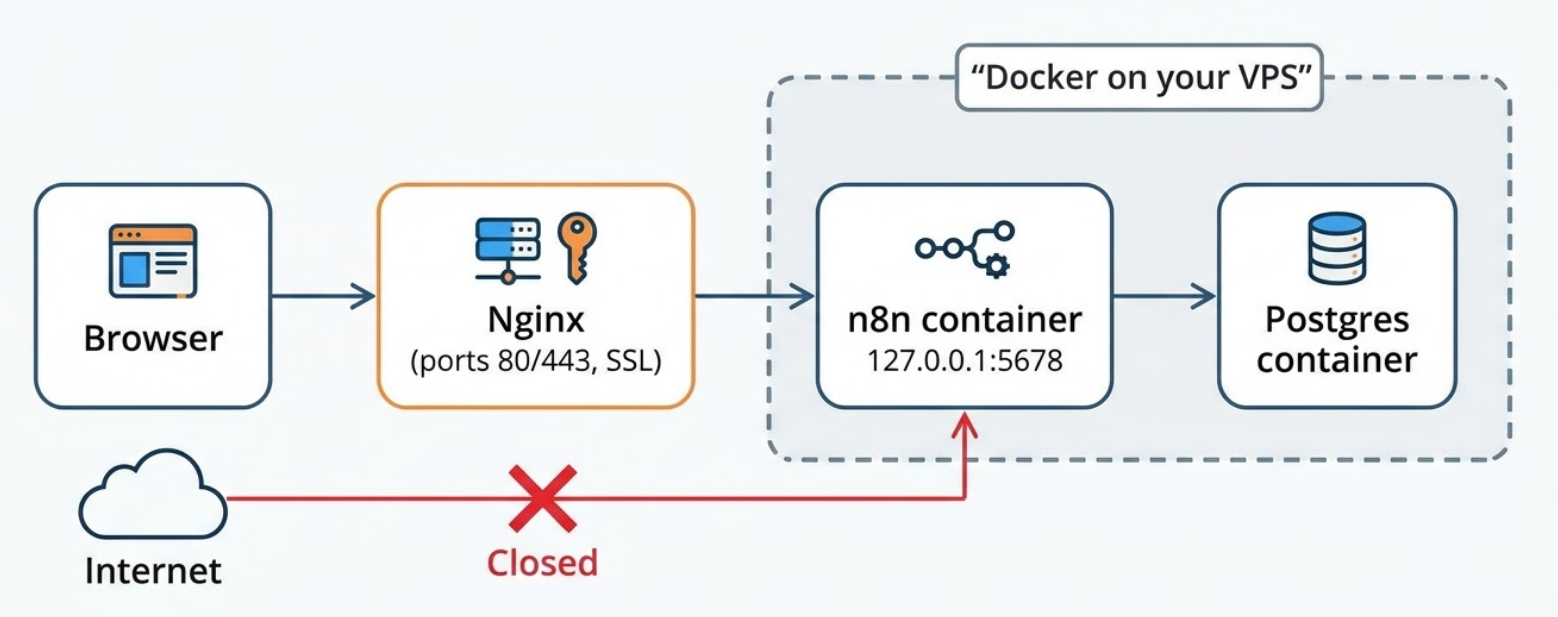
Step 6: Firewall, DNS and Free SSL
Open only the ports you need
Allow SSH first, or you’ll lock yourself out:
sudo ufw allow OpenSSH
sudo ufw allow 'Nginx Full'
sudo ufw enable
sudo ufw status
For more detail, see our guides on opening ports 80 and 443 with UFW and how to secure and firewall a VPS server.
Point your domain to the server
In your domain’s DNS settings, add an A record:
| Type | Name | Value |
|---|---|---|
| A | n8n | YOUR_SERVER_IP |
Wait until ping n8n.example.com shows your server’s IP. This can take a few minutes up to a few hours.
Install the SSL certificate
sudo apt install -y certbot python3-certbot-nginx
sudo certbot --nginx -d n8n.example.com
Choose the option to redirect HTTP to HTTPS when asked. Certbot renews the certificate automatically, and you can confirm that works with:
sudo certbot renew --dry-runUsing Cloudflare? Issue the certificate first, then set Cloudflare’s SSL mode to Full (strict). We walk through it in how to use Cloudflare with your VPS. If you already have other sites on the server, our guide on setting up subdomains with Let’s Encrypt on Nginx may help too.
Step 7: Create Your Account and First Workflow
Open https://n8n.example.com in your browser. On the first visit, n8n asks you to create the owner account. Use a long, unique password. This account controls everything, including every credential you store.
Now build a simple workflow to see it work:
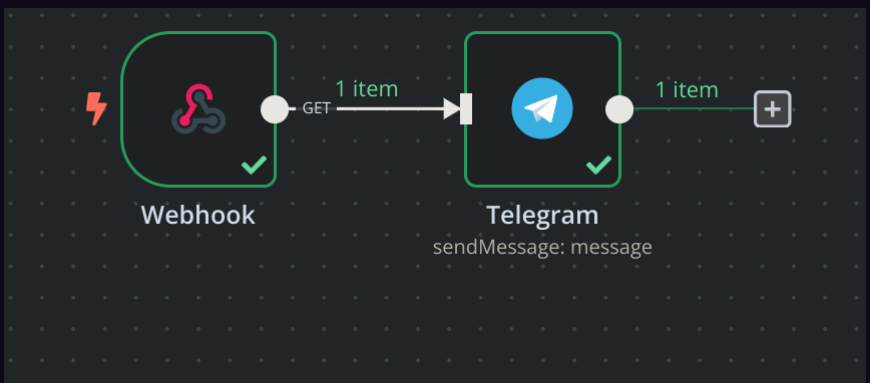
- Click Create workflow.
- Add a Webhook trigger node. Copy its Test URL and check that it starts with your own domain, not
localhost. - Add a second node, such as Telegram, Gmail, or Google Sheets, and connect it to the webhook.
- Click Execute workflow, then send a test request from your terminal:
curl -X POST "https://n8n.example.com/webhook-test/YOUR-PATH" -d "name=Test" - When it works, switch the workflow to Active (newer versions call this Publish) and use the Production URL from then on.
The Test URL only works while you’re watching the editor. The Production URL works around the clock once the workflow is active. Mixing them up is the number one reason a webhook “works in the editor but not in real life.”
Step 8: Back Up, Update and Keep It Secure
Back up your data
A self-hosted n8n is your responsibility, so set up backups before you build anything important. Back up three things: the database, the n8n data folder, and your .env file (which holds the encryption key).
cd ~/n8n
docker compose exec -T postgres pg_dump -U n8n n8n > n8n-backup-$(date +%F).sql
Copy that file off the server. A backup that lives only on the same VPS isn’t really a backup. We showed how to automate this in how to back up your VPS automatically with Google Drive or Dropbox.
n8n can also export your workflows from inside the editor. That’s handy as a second copy of the workflows themselves.
Update n8n
Updating takes two commands:
cd ~/n8n
docker compose pull
docker compose up -d
Take a database backup first, and glance at the n8n release notes before big version jumps. For production workflows, you can also pin a specific version in your compose file (for example docker.n8n.io/n8nio/n8n:1.xx.x instead of the default tag) and upgrade on your own schedule instead of whenever you happen to pull.
Security checklist
- Keep port 5678 closed to the public (we did this by binding to
127.0.0.1). - Use a strong, unique owner password.
- Keep your server updated with
sudo apt update && sudo apt upgraderegularly. - Store your encryption key and
.envfile somewhere safe, and never post them online. - Only install community nodes you trust. They run code on your server.
Running on a small plan? Memory spikes can crash heavy workflows. Adding swap helps, and we explain how in what swap memory is and whether you should enable it on your VPS.
Common Errors and How to Fix Them
| Problem | Likely cause | Fix |
|---|---|---|
| 502 Bad Gateway | n8n isn’t running, or Nginx points to the wrong port | Run docker compose ps and docker compose logs n8n. Check that proxy_pass uses 127.0.0.1:5678. |
| “Connection lost” in the editor | WebSocket headers missing in Nginx | Make sure the Upgrade and Connection lines are in your config, then reload Nginx. |
| Webhook URLs show localhost | WEBHOOK_URL is missing or wrong |
Set it to https://your-domain/ in the compose file, then run docker compose up -d. |
| Secure cookie error | You’re opening n8n over plain HTTP | Use the HTTPS address. Only for quick local testing, you can set N8N_SECURE_COOKIE=false, but never on a public server. |
| OAuth login (Google, Slack) fails | Callback URL doesn’t match your domain | Check N8N_HOST and WEBHOOK_URL, and use the exact redirect URL n8n shows in the credential screen. |
| Credentials broken after moving or rebuilding | The encryption key changed or the data volume was lost | Restore the original N8N_ENCRYPTION_KEY and the n8n_data volume. |
| Changes to the compose file don’t apply | The container wasn’t recreated | Run docker compose up -d again. n8n only reads environment variables at startup. |
| Server runs out of memory | Plan too small for your workflows | Add swap, reduce saved execution data, or move to a 2 GB plan. |
When in doubt, read the logs first:
docker compose logs --tail 100 n8n
sudo tail -f /var/log/nginx/error.log
FAQ
Is self-hosting n8n really free?
The Community Edition costs nothing to run, so your only cost is the VPS and your domain. It’s source-available under n8n’s own license rather than classic open source. That’s fine for your own projects and internal business use. Read the license if you want to offer n8n to others as a paid service.
How much RAM do I need to run n8n?
1 GB works for a handful of light workflows, ideally with swap enabled. If you run many workflows, process large files, or have AI nodes working with big payloads, go for 2 GB or more. Memory is the first thing a small server runs out of.
Can I run n8n on a free VPS?
Most free VPS plans have very little RAM and strict limits, so they’re only good for trying n8n out. For real automations that must run all day, use a paid VPS with at least 1 to 2 GB. You can try a free VPS first to practice the steps in this guide.
Should I use SQLite or Postgres?
SQLite is the default and is fine for testing. Postgres is the better choice for anything you depend on, because it handles more load, is easier to back up properly, and is what most production setups use.
Can I run n8n without a domain?
You can reach it by IP and port for a quick test, but it’s not recommended. You won’t get proper HTTPS, and many apps won’t let their login flows redirect back to a bare IP address. A cheap domain or a free subdomain solves this.
n8n or Zapier: which is better?
Zapier is easier to start with and needs no server. n8n takes some setup, but it gives you unlimited workflows, deeper logic (loops, code, branching), your own data storage, and no per-task pricing. If you’re comfortable following a guide like this one, self-hosting usually pays for itself quickly.
Final Thoughts
You now have your own automation platform: n8n and Postgres in Docker, Nginx in front, HTTPS on your own domain, and a firewall that only lets in what it should. Once it’s up, the real fun starts, because every repetitive task you do by hand becomes a candidate for a workflow.
The three things to get right are keeping port 5678 closed to the public, saving your encryption key, and backing up regularly. Do those, and n8n will run quietly in the background for a long time.
Need a server to run it on? Check our Linux VPS plans, or start with a free VPS trial to practice first. Stuck on a step? Leave a comment below and we’ll help you out.